0
How to Repair Discs for Disc Golf Success
Disc golf discs take a beating out on the course and every experienced player knows that a single deep scratch can mess up your throw. Even minor imperfections can dramatically alter flight performance. Most folks jump straight to buying replacements when a disc gets banged up but repairing them yourself can actually restore both feel and flight—if you know the right steps.
Table of Contents
- Step 1: Gather Necessary Repair Supplies
- Step 2: Clean and Inspect the Discs Thoroughly
- Step 3: Identify and Document Damage Extent
- Step 4: Apply Repair Techniques Based on Damage Type
- Step 5: Test Disc Integrity After Repairs
- Step 6: Store Discs Properly to Prevent Future Damage
Quick Summary
| Key Point | Explanation |
|---|---|
| 1. Gather essential repair supplies | Assemble fine-grit sandpaper, cleaning materials, and heat tools to effectively address disc damage. |
| 2. Conduct thorough cleaning and inspection | Clean the disc to reveal damage and inspect for imperfections that affect performance. |
| 3. Document the extent of damage | Create a detailed report of damage locations and types to inform your repair strategy. |
| 4. Apply targeted repair techniques | Use specific methods for different damage types, like sanding for scratches or heat for warping. |
| 5. Test integrity post-repair | Perform physical and flight tests to assess if repairs restore the disc’s performance. |
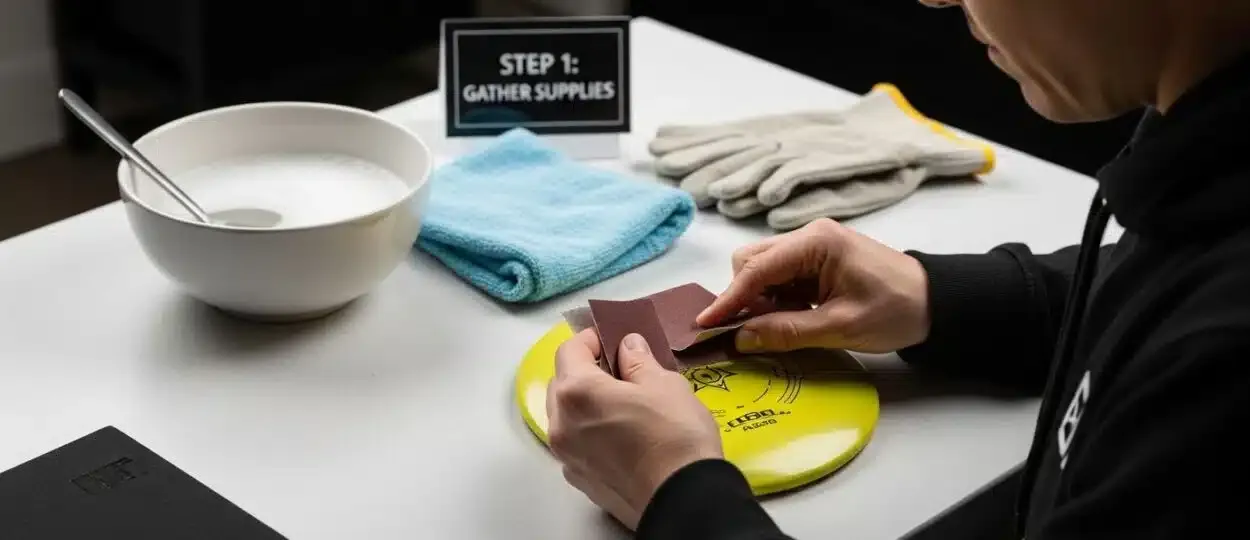
Step 1: Gather Necessary Repair Supplies
Repairing a damaged disc golf disc requires careful preparation and the right set of tools. Before you begin the repair process, assembling a comprehensive repair kit will ensure you can address various types of disc damage effectively. Your success depends on having the right supplies ready before starting.
To get started, you’ll need several key items that will help you restore your disc to its optimal condition. First, collect fine-grit sandpaper with a rating between 320 and 400, which provides the ideal texture for smoothing out minor nicks and scratches without causing additional damage. You’ll also want to have warm water, mild dish soap, and a soft clean cloth for initial cleaning and surface preparation. Check out our guide on cleaning disc golf discs for more detailed insights into preparing your disc for repair.
For those dealing with more significant warping, additional tools become crucial. A heat-resistant bowl, heat-resistant gloves, and a flat surface with some weights will help you carefully reshape discs that have become misaligned. Patience is key during this process – rushing can cause further damage to your disc. Some disc golfers also find a hair dryer or heat gun useful for gentle reshaping, but these should be used with extreme caution and minimal direct heat exposure.
Your repair kit should include these essential items:
- Fine-grit sandpaper (320-400 grit)
- Soft clean cloth
- Mild dish soap
- Warm water
- Heat-resistant gloves
- Flat weighted surface
- Optional: heat gun or hair dryer
By methodically gathering these supplies before beginning your disc repair, you set yourself up for the best possible outcome. Each tool serves a specific purpose in returning your disc to its original playing condition, whether you’re smoothing out surface imperfections or correcting minor warping.
Step 2: Clean and Inspect the Discs Thoroughly
After gathering your repair supplies, the next critical step is thoroughly cleaning and inspecting your disc golf discs. Proper cleaning reveals the true extent of damage and prepares the surface for potential repairs. This meticulous process allows you to understand exactly what restoration techniques will be most effective. Learn more about comprehensive disc maintenance to maximize your disc’s performance and longevity.
Begin by creating a gentle cleaning solution using warm water and mild dish soap. Submerge your disc and use a soft cloth to remove dirt, grass stains, and debris accumulated during play. Avoid using harsh chemicals or abrasive materials that could further damage the disc’s surface. Gently rotate the disc, ensuring you clean both the top and bottom surfaces, paying special attention to areas with visible scratches or nicks. Rinse the disc thoroughly with clean water to remove all soap residue, which could interfere with subsequent repair processes.
Once cleaned, perform a comprehensive visual inspection under good lighting. Hold the disc at different angles to identify subtle imperfections that might not be immediately apparent. Look for signs of structural damage such as:
- Deep gouges or cuts in the plastic
- Warping or uneven edges
- Significant surface scratches
- Cracks or stress lines
- Discoloration or material breakdown
Run your fingers gently along the disc’s edges and surface to feel for irregularities that might not be visible. Small imperfections can significantly impact disc flight performance, so be thorough in your examination. By meticulously cleaning and inspecting your disc, you create a clear roadmap for the repair process, ensuring you apply the most appropriate restoration techniques to bring your disc back to optimal condition.
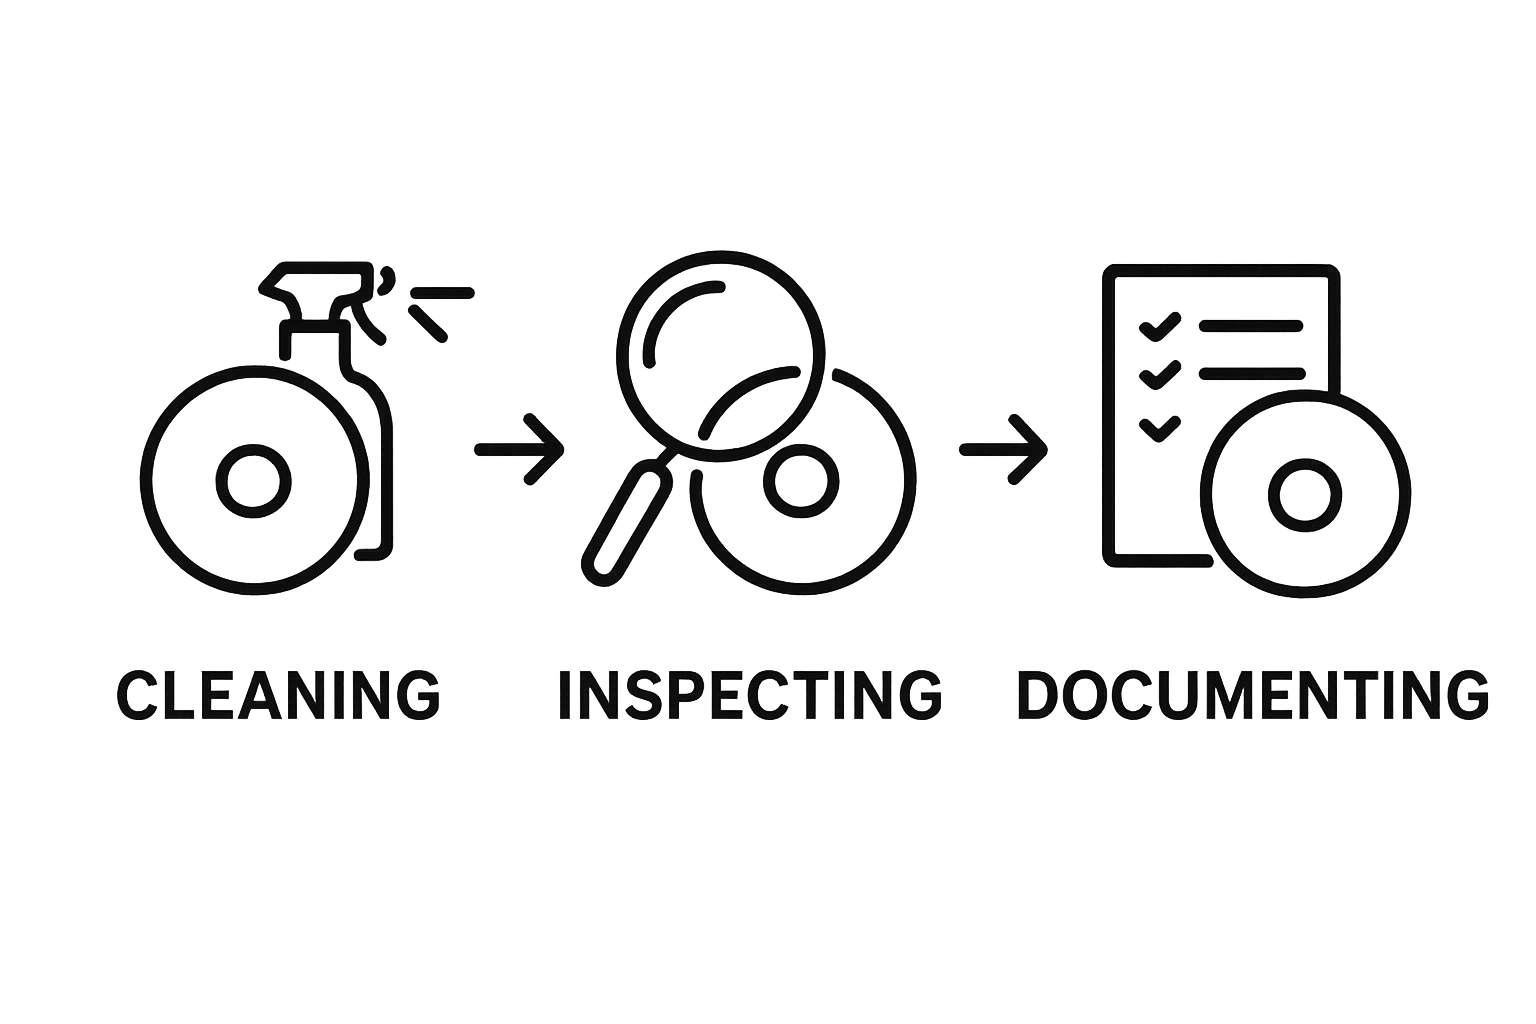
Step 3: Identify and Document Damage Extent
After cleaning your disc, the next crucial step is to precisely identify and document the extent of damage. Accurate damage assessment determines the appropriate repair strategy and helps you understand whether the disc can be restored to tournament-legal condition. According to the Professional Disc Golf Association guidelines, certain modifications are permissible while others can render a disc unusable in competitive play.
Carefully examine the disc under bright, direct light to reveal subtle imperfections that might have been missed during initial cleaning. Use a magnifying glass if available to inspect microscopic scratches and potential stress lines. Pay special attention to the disc’s rim and flight plate, as these areas are most critical to the disc’s performance. Different types of damage require different repair approaches – surface scratches might need light sanding, while deep gouges or structural cracks could potentially compromise the disc’s integrity.
Document your findings systematically to create a comprehensive repair roadmap. Sketch or photograph the damaged areas, noting the location, size, and depth of each imperfection. Create a detailed damage report that includes:
- Precise location of damage on the disc
- Type of damage (scratch, gouge, crack, warping)
- Depth and length of each imperfection
- Potential impact on disc flight characteristics
- Initial assessment of repairability
Understand that not all disc damage can be successfully repaired. Some structural damages might permanently alter the disc’s flight performance, making it unsuitable for competitive play.
Below is a table summarizing the most common disc damage types mentioned in the article, their descriptions, and the recommended repair approach for each.
| Damage Type | Description | Recommended Repair Approach |
|---|---|---|
| Surface Scratch | Minor abrasions on the disc | |
| due to impact | Fine-grit sandpaper in light circular motions | |
| Deep Gouge | Deeper cuts or notches in the plastic | Careful sanding and inspection for cracks |
| Warping | Distortion of disc shape, often from heat | Gentle heat application, reshape on flat surface |
| Crack | Small structural fracture or split | Assess if repairable; may require replacement |
| Discoloration | Surface or material color change | Clean thoroughly; inspect for breakdown |
| Your documentation will help you decide whether to attempt repair, seek professional restoration, or replace the disc entirely. By meticulously identifying and recording the damage, you create a strategic approach to disc restoration that maximizes your chances of returning the disc to optimal condition. |
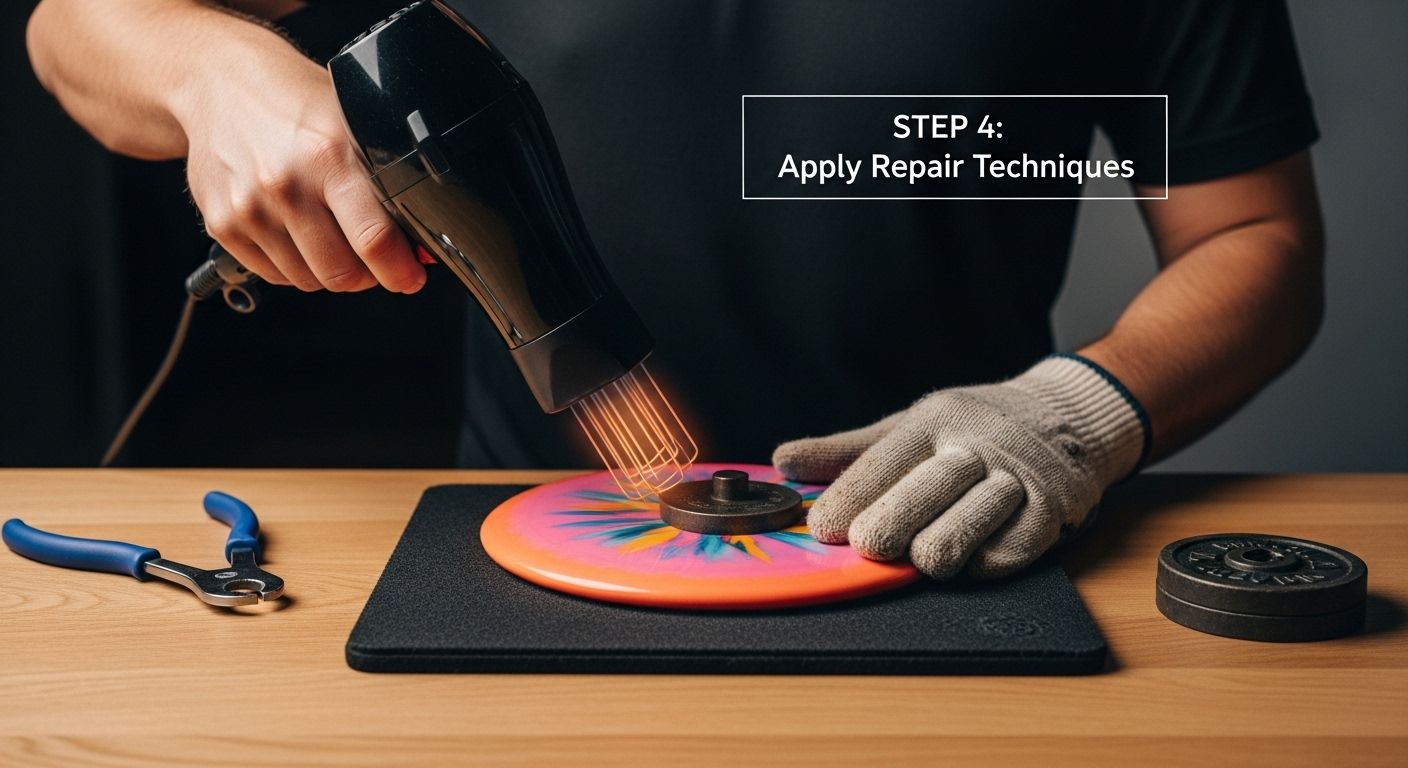
Step 4: Apply Repair Techniques Based on Damage Type
With a comprehensive understanding of your disc’s damage, you can now strategically apply targeted repair techniques. Different damage types require specific approaches to restore the disc’s integrity and flight characteristics. The goal is to minimize additional stress while addressing the specific imperfections discovered during your earlier inspection.
For surface-level scratches and minor abrasions, fine-grit sandpaper becomes your primary tool. Work carefully and consistently, using light circular motions to smooth out imperfections. Begin with the least aggressive sanding technique, gradually increasing pressure only if necessary. Hold the sandpaper at a consistent 45-degree angle, ensuring you maintain an even pressure across the disc’s surface. The objective is to create a smooth, uniform texture that doesn’t compromise the disc’s original structural integrity. Learn more about precise disc maintenance techniques to refine your repair skills.
Warped discs require a more delicate intervention. Heat can be both a solution and a potential risk when addressing warping. For slight warps, place the disc on a flat, heat-resistant surface and use a hair dryer set to low heat. Move the heat source consistently across the warped area, maintaining a distance of at least six inches. Apply gentle, even pressure with a flat weight once the plastic becomes slightly pliable. Be patient and avoid overheating, which could permanently damage the disc.
Critical considerations for disc repair include:
- Always work in a well-ventilated area
- Use protective gloves during heat application
- Test repair techniques on a small, inconspicuous area first
- Stop immediately if the disc shows signs of melting or significant structural change
- Understand that not all damage can be successfully repaired
After completing your repair, perform a final inspection to ensure the disc maintains its original flight characteristics. A successful repair should restore the disc’s surface and structural integrity without compromising its performance.
Step 5: Test Disc Integrity After Repairs
The final and most critical stage of disc repair is thoroughly testing the disc’s integrity to ensure your restoration efforts have successfully returned it to playable condition. Comprehensive testing goes beyond visual inspection, requiring a systematic approach that evaluates both physical characteristics and flight performance. According to the World Flying Disc Federation guidelines, discs must maintain specific structural and performance standards to be considered tournament-legal.
Begin with a detailed physical examination, carefully running your fingers along the repaired areas to check for smooth transitions and detect any remaining irregularities. Hold the disc up to bright light to reveal any hidden structural changes or potential weak points that might have occurred during the repair process. Flex the disc gently to assess its flexibility and structural integrity, paying close attention to how the plastic responds. Any unusual cracking sounds, resistance, or uneven bending could indicate that the repair was unsuccessful or that the disc has been compromised.
The next phase involves practical flight testing, which provides the most definitive assessment of your repair work. Find an open area with minimal wind and perform several controlled throws using different techniques. Observe the disc’s flight path, stability, and distance compared to its pre-repair performance. Key indicators of successful repair include:
- Consistent flight trajectory
- Maintained original turning and fading characteristics
- No wobbling or unexpected mid-flight deviation
- Comparable distance to pre-repair throws
- Smooth release and stable flight pattern
Remember that not all discs can be fully restored to their original condition. If the disc demonstrates significant performance variations or shows signs of structural weakness, it may be more prudent to replace it rather than risk potential failure during a critical throw. Your meticulous testing ensures that you only return repaired discs to your playing rotation when they meet the highest standards of performance and reliability.
Step 6: Store Discs Properly to Prevent Future Damage
Proper disc storage is the final critical step in maintaining your disc golf equipment’s longevity and performance. Thoughtful storage prevents unnecessary wear and potential damage that could compromise your carefully repaired discs. Understanding the environmental factors that impact disc integrity is crucial for preserving your investment. Check out our guide on disc golf equipment maintenance for additional insights into protecting your gear.
Choose a dedicated storage container that provides protection from extreme temperatures, direct sunlight, and potential physical compression. Ideal storage environments maintain consistent temperature and humidity, avoiding locations like car trunks, garages, or areas with significant temperature fluctuations. Invest in a specialized disc golf bag or a hard-sided storage case with individual compartments that prevent discs from pressing against each other. Soft-sided cases with padded dividers can also provide excellent protection, minimizing the risk of accidental scratches or warping.
When placing discs in storage, arrange them vertically to prevent warping and reduce pressure on individual discs. Organize your discs by type and weight to make selection easier and minimize unnecessary handling. Avoid stacking heavy objects on top of your disc storage container, as consistent pressure can gradually deform the plastic. Consider using silica gel packets in your storage area to control moisture and prevent potential mold or degradation.
Critical storage considerations include:
- Store discs at room temperature (60-75 degrees Fahrenheit)
- Keep discs away from direct sunlight and heat sources
- Use individual protective sleeves for premium or specialty discs
- Clean discs thoroughly before long-term storage
- Rotate stored discs periodically to prevent permanent deformation
By implementing these storage strategies, you create a protective environment that extends the life of your discs, maintains their performance characteristics, and preserves the results of your careful repair work. Regular inspection during storage ensures your discs remain in optimal condition, ready for your next disc golf adventure.
Here is a checklist table summarizing the critical storage considerations for preventing future disc damage, based entirely on the article’s recommendations.
| Storage Consideration | Recommended Practice |
|---|---|
| Room Temperature | 60-75[NULL]0F to avoid warping |
| Away from Sunlight/Heat | Prevents plastic breakdown |
| Individual Sleeves for Discs | Especially for premium or specialty discs |
| Clean Before Storage | Reduces risk of residue or damage |
| Vertical Arrangement | Prevents warping and pressure deformities |
| Moisture Control | Use silica gel packets if needed |
| Periodic Rotation | Helps avoid permanent deformation |
Repair Is Just the Start: Set Yourself Up for Disc Golf Success
Struggling to keep your discs in top shape can be frustrating, especially when deep scratches, warping, or structural damage hold back your performance. Every disc golfer wants reliable equipment so repairs truly matter for your game. But why stop at making do with what you have? Think about how much smoother your routine could be with trusted replacements and specialized gear that matches your commitment to disc golf excellence.
Take the next step toward elevating your game. Secure reliable backup discs, cleaning kits, and disc golf essentials at GolfDiscs.com. Get everything you need to supplement your repairs or find the perfect replacements if your current disc just will not fly right. Want deeper insights into cleaning disc golf discs? Discover best practices right on our site and keep every disc competition-ready. Visit GolfDiscs.com now and experience smoother throwing and greater consistency every time you play.
Frequently Asked Questions
How do I gather the necessary supplies for disc golf disc repair?
To repair a damaged disc golf disc, gather fine-grit sandpaper (320-400 grit), warm water, mild dish soap, a soft cloth, heat-resistant gloves, and optional tools like a heat gun or hair dryer. A flat weighted surface will also be helpful for reshaping warped discs.
What is the best method for cleaning a disc golf disc before repair?
Begin by creating a warm water and mild dish soap solution. Submerge the disc and use a soft cloth to remove dirt and debris. Avoid harsh chemicals or abrasive materials, and rinse thoroughly after cleaning to ensure all soap residue is removed.
How can I assess the extent of the damage on my disc golf disc?
Inspect your disc under bright light, looking for deep gouges, warping, cracks, or surface scratches. Document the size and location of each imperfection, noting their potential impact on flight characteristics to determine the best repair approach.
What techniques should I use to repair different types of damage on my disc golf disc?
For surface scratches, use fine-grit sandpaper in light circular motions. For warped discs, gently heat the area with a hair dryer, then apply gentle pressure to reshape. Always test your methods on a small area first to avoid further damage.